
Rclone 是一个命令行程序,用于管理云存储上的文件。它是云供应商的网络存储接口的一个功能丰富的替代品。超过 40 种云存储产品支持 rclone,包括 S3 对象存储、企业和消费者文件存储服务以及标准传输协议。
用户称 Rclone 为“云存储的瑞士军刀”、 “无异于魔法的科技”。
Rclone 具有强大的云等同于 unix 命令 rsync、cp、mv、mount、ls、ncdu、tree、rm 和 cat。Rclone 熟悉的语法包括 shell 管道支持和--dry-run保护。它在命令行、脚本或通过其API 使用。
Rclone多种文件传输协议,支持SFTP,HTTP,WebDAV,FTP和DLNA。Rclone是一个成熟的开源软件,最初受rsync的启发并采用Golang编写。其文档和社区也都非常好,提供广泛和友好的使用用例。
安装Rclone
在服务器上执行以下脚本安装Rclone,期间根据提示输入密码。我这里服务器使用的是Ubuntu。
sudo -v ; curl https://rclone.org/install.sh | sudo bashubuntu@VM-0-8-ubuntu:~$ sudo -v ; curl https://rclone.org/install.sh | sudo bash
[sudo] password for ubuntu:
% Total % Received % Xferd Average Speed Time Time Time Current
Dload Upload Total Spent Left Speed
100 4734 100 4734 0 0 6203 0 --:--:-- --:--:-- --:--:-- 6196
Archive: rclone-current-linux-amd64.zip
...
...
...
rclone v1.70.1 has successfully installed.
Now run "rclone config" for setup. Check https://rclone.org/docs/ for more details.执行rclone version命令来查看是否安装成功。
ubuntu@VM-0-8-ubuntu:~$ rclone version
rclone v1.69.3
- os/version: ubuntu 22.04 (64 bit)
- os/kernel: 5.15.0-122-generic (x86_64)
- os/type: linux
- os/arch: amd64
- go/version: go1.24.3
- go/linking: static
- go/tags: none
本地NAS配置
新建一个文件夹
首先我们需要在NAS的下建立一个文件夹作为rclone远程目录的根文件夹,用来存放云服务器备份。假设我们在NAS根文件夹下新建了一个名为cloudbak的文件夹。
准备一个用户
在NAS新建一个用户,该用户必须要拥有上一步新建文件夹的读写权限。假设我们的用户名为zhangsan,密码为Aa12#45。
开启WebDAV
Rclone支持多种文件传输协议,我们这里选择WebDAV,并在NAS中开启WebDAV服务。由于各品牌NAS的配置界面各不相同,这里界面仅作为展示。
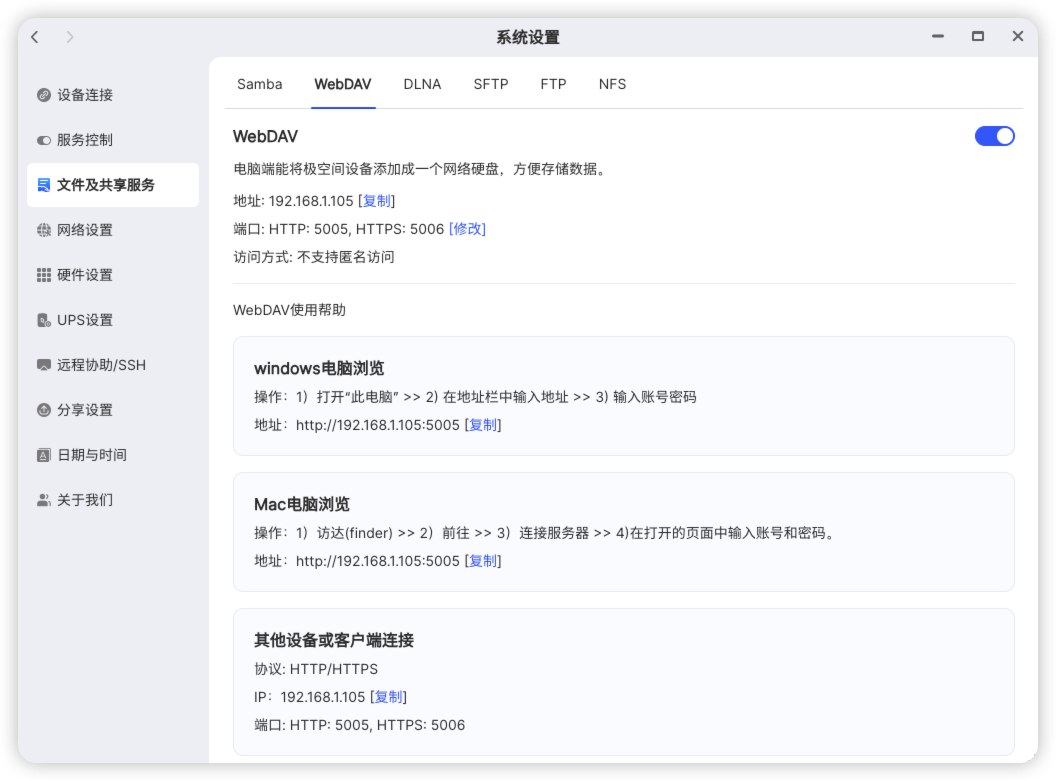
暴露端口
WebDAV默认使用5005(http)和5006(https)作为端口。由于NAS运行在内网,要想访问NAS的WebDAV服务,需要将其中一个端口暴露至公网。如果使用http就暴露5005,如果使用https则暴露5006。。
暴露端口分为两种情况。一种是有公网IP,这种就方便了,直接在路由器上配置一下端口映射就行了;另一种是没有公网IP,这就需要在NAS上做内网穿透。关于内网穿透的知识我可能会在后续分享。
这一步端口暴露的过程需要大家自行解决。
假设我们已经拥有公网IP,且对应了域名www.nascloud.com。为了简单起见,我们直接暴露http端口5005。
Rclone挂载WebDAV
安装完成后Rclone会提示我们使用rclone config来设置。
执行sudo rclone config。
ubuntu@VM-0-8-ubuntu:~$ sudo rclone config
[sudo] password for admins:
2025/06/20 15:08:39 NOTICE: Config file "/root/.config/rclone/rclone.conf" not found - using defaults
No remotes found, make a new one?
n) New remote
s) Set configuration password
q) Quit config
n/s/q> 由于此前从来没有任何的rclone配置,所以rclone会提示我们没有找到rclone.conf的配置文件,是否要新建一个。我们这里输入n并回车,新建一个远程连接。
ubuntu@VM-0-8-ubuntu:~$ sudo rclone config
[sudo] password for admins:
2025/06/20 15:08:39 NOTICE: Config file "/root/.config/rclone/rclone.conf" not found - using defaults
No remotes found, make a new one?
n) New remote
s) Set configuration password
q) Quit config
n/s/q> n

Enter name for new remote.
name> 紧接着rclone会提示我们输入远程连接的名称,我们可以起一个自己喜欢的名字,这里我输入mynas并回车。
Enter name for new remote.
name> mynas

Option Storage.
Type of storage to configure.
Choose a number from below, or type in your own value.
 1 / 1Fichier
   \ (fichier)
 2 / Akamai NetStorage
   \ (netstorage)
 3 / Alias for an existing remote
   \ (alias)
 4 / Amazon S3 Compliant Storage Providers including AWS, Alibaba, ArvanCloud, Ceph, ChinaMobile, Cloudflare, DigitalOcean, Dreamhost, Exaba, FlashBlade, GCS, HuaweiOBS, IBMCOS, IDrive, IONOS, LyveCloud, Leviia, Liara, Linode, Magalu, Mega, Minio, Netease, Outscale, Petabox, RackCorp, Rclone, Scaleway, SeaweedFS, Selectel, StackPath, Storj, Synology, TencentCOS, Wasabi, Qiniu and others
   \ (s3)
 5 / Backblaze B2
   \ (b2)
 6 / Better checksums for other remotes
   \ (hasher)
 7 / Box
   \ (box)
 8 / Cache a remote
   \ (cache)
 9 / Citrix Sharefile
   \ (sharefile)
10 / Cloudinary
   \ (cloudinary)
11 / Combine several remotes into one
   \ (combine)
12 / Compress a remote
   \ (compress)
13 / DOI datasets
   \ (doi)
14 / Dropbox
   \ (dropbox)
15 / Encrypt/Decrypt a remote
   \ (crypt)
16 / Enterprise File Fabric
   \ (filefabric)
17 / FTP
   \ (ftp)
18 / FileLu Cloud Storage
   \ (filelu)
19 / Files.com
   \ (filescom)
20 / Gofile
   \ (gofile)
21 / Google Cloud Storage (this is not Google Drive)
   \ (google cloud storage)
22 / Google Drive
   \ (drive)
23 / Google Photos
   \ (google photos)
24 / HTTP
   \ (http)
25 / Hadoop distributed file system
   \ (hdfs)
26 / HiDrive
   \ (hidrive)
27 / ImageKit.io
   \ (imagekit)
28 / In memory object storage system.
   \ (memory)
29 / Internet Archive
   \ (internetarchive)
30 / Jottacloud
   \ (jottacloud)
31 / Koofr, Digi Storage and other Koofr-compatible storage providers
   \ (koofr)
32 / Linkbox
   \ (linkbox)
33 / Local Disk
   \ (local)
34 / Mail.ru Cloud
   \ (mailru)
35 / Mega
   \ (mega)
36 / Microsoft Azure Blob Storage
   \ (azureblob)
37 / Microsoft Azure Files
   \ (azurefiles)
38 / Microsoft OneDrive
   \ (onedrive)
39 / OpenDrive
   \ (opendrive)
40 / OpenStack Swift (Rackspace Cloud Files, Blomp Cloud Storage, Memset Memstore, OVH)
   \ (swift)
41 / Oracle Cloud Infrastructure Object Storage
   \ (oracleobjectstorage)
42 / Pcloud
   \ (pcloud)
43 / PikPak
   \ (pikpak)
44 / Pixeldrain Filesystem
   \ (pixeldrain)
45 / Proton Drive
   \ (protondrive)
46 / Put.io
   \ (putio)
47 / QingCloud Object Storage
   \ (qingstor)
48 / Quatrix by Maytech
   \ (quatrix)
49 / SMB / CIFS
   \ (smb)
50 / SSH/SFTP
   \ (sftp)
51 / Sia Decentralized Cloud
   \ (sia)
52 / Storj Decentralized Cloud Storage
   \ (storj)
53 / Sugarsync
   \ (sugarsync)
54 / Transparently chunk/split large files
   \ (chunker)
55 / Uloz.to
   \ (ulozto)
56 / Union merges the contents of several upstream fs
   \ (union)
57 / Uptobox
   \ (uptobox)
58 / WebDAV
   \ (webdav)
59 / Yandex Disk
   \ (yandex)
60 / Zoho
   \ (zoho)
61 / iCloud Drive
   \ (iclouddrive)
62 / premiumize.me
   \ (premiumizeme)
63 / seafile
   \ (seafile)
Storage> OK,这里出来了一大堆存储配置,都是rclone支持的文件传输协议,可以看到WebDAV排在第58位,我们可以输入58,也可以直接输入webdav并回车。
Storage> webdav

Option url.
URL of http host to connect to.
E.g. https://example.com.
Enter a value.
url> 现在rclone提示我们输入WebDAV服务的url,这里我们需要输入公网IP和端口,以及NAS用作云备份文件夹的绝对路径。根据以上内容,我们输入http://www.nascloud.com:5005/cloudbak,如果没有域名,则直接输入NAS所在的公网IP。
url> http://www.nascloud.com:5005/cloudbak

Option vendor.
Name of the WebDAV site/service/software you are using.
Choose a number from below, or type in your own value.
Press Enter to leave empty.
 1 / Fastmail Files
   \ (fastmail)
 2 / Nextcloud
   \ (nextcloud)
 3 / Owncloud 10 PHP based WebDAV server
   \ (owncloud)
 4 / ownCloud Infinite Scale
   \ (infinitescale)
 5 / Sharepoint Online, authenticated by Microsoft account
   \ (sharepoint)
 6 / Sharepoint with NTLM authentication, usually self-hosted or on-premises
   \ (sharepoint-ntlm)
 7 / rclone WebDAV server to serve a remote over HTTP via the WebDAV protocol
   \ (rclone)
 8 / Other site/service or software
   \ (other)
vendor>这里询问我们是那种WebDAV服务,我们选择最后一个:其他。输入8或者other。
vendor> other

Option user.
User name.
In case NTLM authentication is used, the username should be in the format 'Domain\User'.
Enter a value. Press Enter to leave empty.
user> 这里我们需要输入在NAS的用户名zhangsan。
user> zhangsan

Option pass.
Password.
Choose an alternative below. Press Enter for the default (n).
y) Yes, type in my own password
g) Generate random password
n) No, leave this optional password blank (default)
y/g/n> 选择y,紧接着输入两次zhangsan的密码。
user> zhangsan

Option pass.
Password.
Choose an alternative below. Press Enter for the default (n).
y) Yes, type in my own password
g) Generate random password
n) No, leave this optional password blank (default)
y/g/n> y
Enter the password:
password:
Confirm the password:
password:

Option bearer_token.
Bearer token instead of user/pass (e.g. a Macaroon).
Enter a value. Press Enter to leave empty.
bearer_token> bearer_token不用理,直接回车。
Option bearer_token.
Bearer token instead of user/pass (e.g. a Macaroon).
Enter a value. Press Enter to leave empty.
bearer_token>

Edit advanced config?
y) Yes
n) No (default)
y/n>
这里询问需不需要编辑高级配置,我们不用编辑,直接回车。
Configuration complete.
Options:
- type: webdav
- url: http://www.nascloud.com:5005/cloudbak
- vendor: other
- user: zhangsan
- pass: *** ENCRYPTED ***
Keep this "mynas" remote?
y) Yes this is OK (default)
e) Edit this remote
d) Delete this remote
y/e/d> 这里询问是否保存mynas这个远程配置,配了这么久,当然要保存!果断回车!
Current remotes:

Name                 Type
====                 ====
mynas                webdav

e) Edit existing remote
n) New remote
d) Delete remote
r) Rename remote
c) Copy remote
s) Set configuration password
q) Quit config
e/n/d/r/c/s/q> q到此为止,我们已经有一个名为mynas的远程配置了,输入q,退出配置。
如果后续我们需要修改mynas的配置,我们可以再次运行sudo rclone config,然后选择e,编辑配置。
最后,测试挂载是否成功
执行命令sudo rclone lsd mynas:/ --max-depth 1观察结果是否和NAS上的一致。
使用Cron执行定期备份
执行sudo crontab -e
在配置最后添加一行0 2 * * * rclone copy /opt/src mynas:/dst
该配置行表示每天凌晨两点执行rclone copy /opt/src mynas:/dst这条指令。
rclone copy /opt/src mynas:/dst表示将/opt/src目录下的所有文件拷贝到远程目录mynas:/dst ,也就是NAS的/cloudbak/dst目录。